Saturday 9 July 2011

Fixing the Toaster

Sometimes, things just break. Maybe it's planned obsolescence; I don't really know. But I don't want to be wasting things just because they "seem" to not work anymore.

Speaking of things not working, our toaster-oven (a Bravetti) recently stopped turning on. (You didn't see that coming, did you?) Turning on the timer didn't light the lamp, and didn't electrify the elements. A bit of a problem when you want to toast things (pizza in a microwave just isn't the same!)

Taking Things Apart

As it turns out, the same thing has happened before. That made this work pretty easy as I knew exactly where to look for the problem. As a plus, this is an easy fix and if it must fail, I'd pick this over some other problem.

First, you need to take out all the screws around the top cover. On this model, they're on the back and on the bottom along the feet. Remove the cover and you can see all the wiring as in the picture.

The top control is temperature, middle is heating mode, and bottom is the timer. Our trouble arises in the timer control. You need to pull off the front dial. It's got some goop in it to hold it in place, so I wedge it out with a flathead screwdriver. Once it's off, take out the two screws holding the timer control onto the panel. Pull out the electrical contacts, and you're good.

So now you have the timer control; what to do with it? Open it up, of course! It's locked up using small bent metal tabs. Simply straighten them up with some pliers and you should be able to pull off the top bit. You need to take all of the shell off, as below.

In the picture to the left are the separated parts of the timer control. At the left is the outer shell with the bell. Then the timer mechanism, a cover and another mounting cover.


In this picture we have the back view of the timer mechanism. Keep in mind the little black arm as that interfaces with the silver arm in the bell.


Cleaning the Contacts

That black plastic bit at the top is the site of all the trouble. Take a look at the contact below, which has become black. I don't know whether this is some kind of galvanic corrosion, but it means the switch just doesn't close.

I can't quite remember what I did the last time, but it may have involved scratching at it with a screwdriver. This time, I used a cone sanding bit on a rotary tool to clean it up entirely. It's a bit difficult to see below, but it's much cleaner now. Note, I didn't clean the mount around the contact, so you can see the difference between before and after there.

Finishing Up

Now that the contacts are clean, it's just a matter of putting everything back together. It's important to get the post on the timer aligned with the lever in the bell, or it won't ring when finished. Then reattach all the casing, bend the tabs, and screw the rest all together. And the final test, of course, is to turn it on and toast some bread!

Thursday 30 June 2011

Translating for Fun and Profit

Okay, so maybe I'm not entirely sure about the second one, but it certainly could be fun depending on your interests. Writing translations is probably one of the simplest ways to contribute to an open-source project, especially if you don't know/like coding.

There are a couple of things you'll need to do:

  1. Get the stuff to translate.
  2. Translate the stuff.
  3. Send it back and get it merged.

You'll also need some software. I leave it up to you to figure out how to install it, if you need it (it's easy in any Linux distro!)

  1. I'm going to use git, although it may not be necessary depending on the project.
  2. A translation editor. You can use any plain text editor, but using translation software provides a few conveniences.

Choosing a Project

No matter your likes, it shouldn't be too difficult to find some open source software that you find interesting. Just take a look on SourceForge or in any Linux package database. Of course, you'll also need to know another language, especially the technical terms, which may not be so common.

For some reason or other, I recently installed MyPaint. It's pretty fun to draw stuff, though I'm not yet familiar with all the brushes. And it would be easier if I had a tablet instead of a mouse!

Getting the Text

Obviously, the first thing you need is the text that needs to be translated. MyPaint, like many other open-source projects, uses GNU gettext to translate from one locale to another. A locale defines the language and country. For example, "pt" is Portuguese, while "pt_BR" is Brazilian Portuguese.

MyPaint uses git on Gitorious which makes it pretty easy to get what you need to work on a translation. (Maybe not as easy as translating on LaunchPad or Transifex, but I can't let you go off without learning something).

There are two ways to get the MyPaint source: via git, or via the source package. The MyPaint developers prefer git merge requests, but they'll also accept whole translations directly from the package.

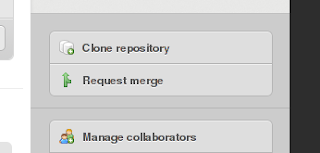
To go the first route, you'll need an account on Gitorious (you can login with OpenID or various other accounts.) Once that's done, you can go to the MyPaint git page. Click the Clone Repository button (see screenshot).

You will then have a personal copy of the code on Gitorious, where you can save all your changes. Using the personal clone URL, you can get a copy of everything with the following command (use your own URL):

git clone git://gitorious.org/~qulogic/mypaint/qulogic-mypaint.git

This will give you a mypaint directory with the source of MyPaint.

Make the Translation

In MyPaint, the translations are in the po directory, which is the common location for many gettext-based projects. These files (*.po) are pretty simple, with a small header at the top describing the language and then the translations. Each translation is given by a msgid and a msgstr which are the original and translated strings, respectively. MyPaint includes a couple commands to start you off.

scons translate=pot
scons translate=<language code>

You'll have to find the correct code for your language from gettext. Once you run the above commands, you will get a <language code>.po file into which the translations will go. First, fill out the translation information at the top of the file for the new language. Then just write out the translations of the msgid in the msgstr sections. Of course, if you have a translation editor, then it'll indicate what you've translated so far, etc., and generally make things easier.

Merging the Translation

Once you've finished writing the translation, there are a couple more steps to getting it merged into the project. Now, assuming you're using git like I started above, you'll need to do the following:

  1. Commit the translations to your repository.
  2. Push the changes to gitorious.
  3. Request a merge from the original project.

Committing translations

The first thing after writing your translation is to commit the result to your repository. I'm not going to explain all of git for you, but basically, as a distributed version control system, you commit changes to your own copy and can share that with everyone else. To commit your changes, you first 'add' the changed files and then 'commit' them.

git add <language code>.po
git commit

Push changes

Now that git has saved your changes as a commit, you need to send those changes to gitorious. This is a simple command to push changes to a remote repository.

git push

Request a Merge

Now that the code is on gitorious, you can request a merge from the upstream project. On gitorious, you just have to click the Request merge button on the right side.

You will get to a page where you can fill in what your changes entail. Just fill in the fields, follow the instructions there, and send off the request.

Now it's just a matter of waiting for your request to be merged!

Wednesday 11 May 2011

Adventures in GNOME3 Land

Over the past few weekends I've been trying out GNOME3 via the Fedora 15 Beta. I've already read many a blog post in opposition to various things, so I was not overly surprised when I tried it out. Fortunately, I have a pretty boring setup because I only tested on my desktop, meaning I didn't have to worry about external monitors or suspending.

In fact, with respect to working with the whole thing, it wasn't a terrible experience. Granted, I made a couple tweaks right off the bat since I knew about them. I still like my menus and buttons with icons, and the default hinting is terrible on an LCD. I didn't really care about the min/max buttons though.

Because I've been using Compiz and not Metacity, the transition to Mutter and GNOME Shell was pretty easy. One thing I miss is the "Put" plugin, which allowed moving a non-maximized window to any of 9 positions on the screen using the keypad. And the window switching is a bit boring now.

I even reported a bug or two. These are pretty minor, but everyone's reported the major problems by now, I'm sure. It's the little things that people are going to pick out anyway (like the uncanny valley in robotics/CGI.) Overall, I found the experience pleasant, except for two somewhat annoying problems.

Firstly, the default theme is, well... I was going to say terrible, but on second look, it's not that bad, but still not to my taste. To be honest, I've never been crazy about dark themes. But this theme is some weird conglomerate of dark and light that doesn't mesh well at all. The icons are either black and white (I'm not colour blind!) or sometimes washed out. Take, for example, gedit in the screenshot below. Odd transition from menubar to toolbar, the disabled icons/text are hard to see... It just doesn't look good to me.

Secondly, GNOME3 has koumpounophobia. That's a fear of buttons, for those who don't know (not that I did, and it most likely refers to clothing, really.) I don't live in crazy 1990s Mac land; all my mouse have at least two buttons. My desktop mouse identifies itself as having 12 buttons! (though half are for scrolling, technically) Yet for some unknown reason, right-clicking is totally useless on GNOME Shell. You can't right-click any of the applets on the top panel. It's more likely people will right-click it than hold down Alt as a guess, but that "Shut Down" item is hidden behind the "Suspend" item with an Alt-key. A little lower in the stack, GTK+3 decided to drop scroll-on-notebook-changes-tabs. What's even more annoying is if you have a GTK+2 app, it will scroll nicely, but the "new" apps don't. Unless you try in gnome-terminal, where they implemented it themselves. Inconsistency is never good.

So this Fedora 15 Beta is on a separate external drive. I'm not sure if I'll be upgrading straight away once F15 goes gold. I certainly need to find a real theme first, and I suspect when it's released, there'll be a lot more people with criticism that may nudge things along (as opposed to some knee-jerk reactions by a few early-adopters).

Tuesday 22 March 2011

Skule Nite 1T1

Last weekend was Skule Nite, a "musical sketch comedy revue". Quite hilarious, of course. Just for your listening fun, here are most of the songs on which the parts were based. You're going to just have to imagine the words are funnier, though.

  1. Let's Bring it Back - OK, so I've been listening to the rest of the songs so much, I don't remember how this one sounds...
  2. I Don't C.A. Problem (CA meaning Captain America, of course) - U Can't Touch This (MC Hammer)
  3. Fuji Boys - This is obviously Jersey Boys (based on the music of Frankie Valli and the Four Seasons)
  4. Defying Tragedy - clearly this one's Bohemian Rhapsody (Queen)

  5. Intermission

  6. Petition - Tradition (from Fiddler on the Roof)
  7. A Thoroughly Modern Skule Nite - Thoroughly Modern Millie (OK, I didn't recognize that one at the show and totally had to Google it, but it seems right.)
  8. The Perfect Man - It's Raining Men (The Weather Girls)
  9. Finale - OK, I totally forgot this one. Was is December, 1963 from above (which has the line "Oh, what a night")? I keep remembering the finale based on "Tonight" from a couple years ago.

Tuesday 22 February 2011

I ain't dead yet!

Or something to that effect.

Just been really busy with schoolwork, vacation to India, sleeping...